Kitchen Creations

Wednesday, February 29, 2012

The world's most perfect grain

I didn't even know what quinoa was before I met my husband, the botanist.  I went to a party with him with his graduate school buddies, all botanists.  Let me tell you, there was some incredible food and all of it was botanically interesting!  His professor made quinoa and black beans.  It was so simple and delicious!  I learned a great deal about the "perfect grain" that day.  For starters it's not a true grain, but a chenopod, from the family chenopodiodeae which includes herbs and shrubs and is closely related to species like beets & spinach.  The best part of what I learned is that quinoa is an excellent source of both protein, containing essential amino acids, and dietary fiber!  Really important when trying to be "mostly meatless" and prepare balanced meals!
I love toasting my quinoa a bit before cooking it.  It gives it an extra nutty flavor. 

Enjoy this "super grain" that's not really a grain tonight with your family!

Quinoa & Black Bean Casserole 
Serves 6
Ingredients
Quinoa grains (about 1 cup) - I like using the red quinoa
Black beans (1 can or equivalent if doing dry beans)
1/2 cup corn
½ cup salsa (any kind you like)
1 Tbsp Olive Oil
1 medium onion
2 cloves of garlic
1 Anaheim or Poblano chili, roasted
1/2 cup chopped cilantro
1 tsp. cumin
1 Tbsp. hot sauce (my current favorite it Bufalo Salsa Chipotle)
1/2 - 3/4 cup Cheese (Cheddar or Monterrey/Pepper Jack); shredded
Tortillas or Tortilla chips

Method:
Cook quinoa to package directions (I toast it in olive oil for a few minutes to give it a nuttier flavor before boiling it in water).

Toasting the quinoa

quinoa after it is boiled

Split and seed the chili pepper and lay face down on a baking sheet.  Roast at 475 degrees until skin is blackened (about 4 minutes). Then chop roasted pepper.

Roasted chili adds fantastic flavor

Saute onions & garlic in olive oil until tender.
Mix together sautéed vegetables, cooked quinoa, beans and corn, salsa, cilantro, roasted pepper, cumin & hot sauce.
Pour into baking dish.

Ready for the oven!

Sprinkle top of mixture with shredded cheese.
Bake at 350 degrees until cheese is melty and bubbly, about 15-20 minutes.
Serve with tortilla chips or warm tortillas and salsa & sour cream to taste

Click here for printable recipe

Tuesday, February 21, 2012

Will gives it a NINE!!!

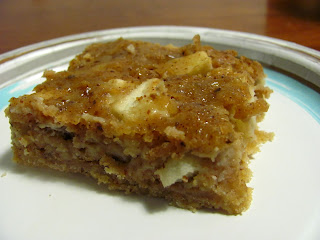
This is a recipe I picked out for our small group Bible study treat last week. The original comes from The Orange Patch Tastes of Fall, cookbook.  Again, our small group peeps were my taste-testers and our friend Will told me he'd give this recipe a nine.  Now Will doesn't give idle compliments, so this means a great deal!!  I myself was really pleased with how they turned out and with the amount of time and effort that went into them (not a ton!)  These are easily eaten with no utensils, which is nice when there are kids around.  If you like larger pieces of apples, I'd suggest just chopping the apples.  If you're into a smoother texture, try shredding the apples.  Either way, I think you're going to be happy with the results.

Dress your apples to the nines tonight!

Sour Cream Apple Squares 
Ingredients:
2 cups flour, sifted
1 1/2 cups brown sugar
1/2 cup butter, softened
1 cup chopped nuts (I used my food processor)
1 Tbsp. cinnamon
1/4 tsp. nutmeg
1/8 tsp. ginger
1 tsp. baking soda
1/2 tsp. salt
1 cup sour cream
2 tsp. vanilla extract
1 egg
2 cups apples, cored, peeled and chopped or shredded

Method:
1.)  Combine flour, sugar and butter in a large mixing bowl, mixing until crumbly.

2.)  Stir in nuts
3.)  Press 2 3/4 cups of the mixture into an ungreased 13 X 9 inch baking pan.

4.)  Add cinnamon, nutmeg, ginger, baking soda, salt, sour cream, vanilla and egg to remaining flour and mix.
5.)  Fold in apples.

6.)  Spread evenly over pressed mixture.

7.)  Bake at 350 degrees for 25-35 minutes.

*** Makes about 18 servings

Click here for printable recipe

Thursday, February 16, 2012

The Beauty of Leftovers

I recently made the absolutely delicious "Stuffed Acorn Squash" dish that I posted a couple of days ago.  Due to my tendency to want to adapt and "personalize" my recipes, making them more my own, I ended up with way more "stuffing" than I had squashes to fill.  What to do with the leftovers?  Hmmmm.....  I looked around my kitchen and cupboards and decided to go with a Mexican style Shepherd's Pie.  I was pretty pleased with the aesthetic and gustatory results.  I hope you will be too!

Ingredients:
5-6 medium potatoes (whatever your favorite kind is when you make mashed potatoes)
1/2 cup milk
1/2 cup sour cream
1/4 cup Parmesan cheese
1 egg
"Stuffed Acorn Squash" filling
or here's the ingredients if you just want to make this:
1 Tbsp. olive oil
1 lb. lean ground turkey
1 tsp. sage
1 tsp. ground black pepper
1 small onion, chopped
1/2 medium green bell pepper,chopped
2 cloves garlic, minced
1 1/2  tablespoons chili powder
2 teaspoons ground cumin
1 can (15 ounces) diced tomatoes
1 15-ounce can black beans, rinsed
2 cups corn
1/2 teaspoon salt
Several dashes hot red pepper sauce, to taste

Method:
1.)  Peel, cube and boil potatoes for about 10 minutes.
2.)  Mash potatoes together with milk, sour cream & Parmesan cheese.
3.)  Add egg to potato mixture.
4.)  Spread ground turkey mixture into a baking dish.
5.)  Sprinkle with shredded cheddar cheese if desired.
6.)  Top mixture with mashed potatoes. 
**You can do this with a spoon, but I was feeling creative and wanted to make leftovers look beautiful.  What can I say, I have fun with food!

  
7.)  Bake @ 350 degrees until turkey mixture is bubbling & potatoes are browned on top.

Tuesday, February 14, 2012

Healthy & Beautiful!

This recipe was sent to me by two people, Shannon and Austyn.  Both times I really wanted to make it, but got side-tracked.  Shannon re-sent it to me recently after we'd had a discussion about it (read, she made my mouth water talking about making it for her family that week) and I decided to get on it and make it!  It was well worth it!  My family loved it and it was so easy, but looks so beautiful and creative.  My boys especially loved having their own "bowls".  The original recipe is found on the "Eating Well" website, but I made some adaptations and ended up with quite a bit more "stuffing" than necessary for the squash bowls.  What I created with that is coming on a later post.   I bet you are on pins and needles waiting for that one! 

Enjoy some healthy and beautiful food with your family tonight!


Ingredients:
3 acorn squash, (3/4-1 pound each)
1 Tbsp. olive oil
1 lb. lean ground turkey
1 tsp. sage
1 tsp. ground black pepper
1 small onion, chopped
1/2 medium green bell pepper,chopped
2 cloves garlic, minced
1 1/2  tablespoons chili powder
2 teaspoons ground cumin
1 can (15 ounces) diced tomatoes
1 15-ounce can black beans, rinsed
2 cups corn
1/2 teaspoon salt
Several dashes hot red pepper sauce, to taste
1/2 cup shredded Cheddar cheese

Method:
1.)  Preheat oven to 375°F. Lightly coat a large baking sheet with cooking spray.
2.)  Cut squash in half horizontally. Scoop out and discard seeds. Place the squash cut-side down on the prepared baking sheet. Bake until tender, about 45 minutes. (I cut mine wrong, but it didn't affect anything too much.  I had to slice off the stem ends so the "bowls" would stand on their own.  That seemed to be the only effect of my cutting error.)

3. ) Meanwhile brown ground turkey, with sage & black pepper, in 1 Tbsp. olive oil, 3 to 5 minutes. Add onion and bell pepper; cook, stirring often, until softened, 3 to 5 minutes. Stir in garlic, chili powder and cumin; cook for 30 seconds. Stir in tomatoes, beans, salt and hot sauce, scraping up any browned bits. Cover, reduce heat, and simmer about 10 minutes.
4.)  When the squash are tender, reduce oven temperature to 325°. Fill the squash halves with the turkey mixture. Top with cheese. Place on the baking sheet and bake until the filling is heated through and the cheese is melted, 8 to 10 minutes.


Monday, February 13, 2012

Party in your mouth pesto!

I just made this tonight and I will say it is probably one of my most favorite meals.  So incredibly flavorful!  My older son ate 3 bowls!!  This is another Rachel Ray, 30 minute meal favorite.  It is a perfect summer meal, when you can get the vegetables fresh, possibly from your very own garden. We've found we enjoy it just about any time of the year though.  The vegetables used in her recipe are asparagus, zucchini & green beans.  I've substituted broccoli for the asparagus and the end result is delicious as well.  Use your imagination and put in the vegetables your family loves most. It is perfect for a main dish or a side, just depending on portion.  The pesto is incredibly flavorful and I love knowing how to make it and use it on other dishes. 

Enjoy a pesto party with your loved ones!

Three-Vegetable Penne with Tarragon-Basil Pesto 
Ingredients:
Salt
1 pound penne rigate pasta (I use whole wheat - it makes it that much more filling)
1/2 pound asparagus, tough ends trimmed
1 small zucchini
1/4 pound haricots verts (thin green beans) - I use regular green beans - trim stem ends
1/4 cup of pine nuts
1 cup fresh basil - about 20 leaves
1/2 cup fresh tarragon, leaves stripped from 10-12 stems
handful of fresh flat-leaf parsley
zest of 1 lemon
1 garlic clove, peeled
1/2 cup grated parmigiano-reggiano cheese
coarse black pepper
1/3 cup extra virgin olive oil

Method:
1.)  Bring a large pot of water to a boil for the pasta. Salt the water, add the pasta and cook to aldente, it should still have a bite to it. SAVE A LADLE FULL OF THE PASTA WATER!!
2.)  Cut the asparagus spears on an angle into 2-inch pieces.Cut the zucchini into matchsticks.Cut the beans on an angle into 2-inch pieces.Add the vegetables to the pot with the pasta after the penne has been cooking for about 5 minutes.
3.)  Boil veggies and pasta together for 2 minutes
4.)  While the pasta is cooking, toast the pine nuts until golden, then cool.

5.) Combine nuts, basil, tarragon, parsley, lemon zest, garlic, 1/2 cup of cheese and a little salt and pepper into food processor.

6.)  While processing, stream in the olive oil until a thick sauce forms.

7.)  Scrape the pesto into a large serving dish or bowl. Add a ladle of hot, starchy pasta water to the pesto. 8.)  Drain the penne and veggies and  add them to the pesto, toss together, coating the pasta and vegetables evenly.

9.)  Add salt and pepper to taste.  Garnish with grated Parmesan cheese.


Sunday, February 5, 2012

Deliciously Healthy!

Well, there is really nothing I like better than a recipe that is good for you but DOESN'T taste like it!  This is a recipe I found in an old Pampered Chef cookbook called, "It's Good For You".  I've adapted it slightly but not a ton.  It is so incredibly flavorful and creamy, but without the cream.  Their trick.... grating corn tortillas into the soup! When I first started making this I grated the tortillas by hand.  It's a hateful kind of job, but that must tell you how good the soup is because I did it often!  Now I stick the tortillas in my food processor and let it do the work for me.  A much better working situation, I must say.  The rest of the prep is extremely simple and the result is terrific.  I usually double the batch for our family so we have some great leftovers for lunches too. 

Get your soup on tonight with this healthy yet delicious meal!

Feelin' Mean, Lean & Green Chili 
(I also adapted the name a bit.  It's sort of a family joke.)
Ingredients:
8 corn tortillas, divided
2 tsp. olive oil, divided
1 cup chopped poblano chili peppers
1/2 cup chopped onion
1 lb. boneless, skinless chicken breasts, cut into 3/4 inch pieces
1 tsp ground cumin
2 garlic cloves, minced
3 1/2 cups chicken or vegetable broth
4 cups black eyed peas (or your favorite light colored bean)
1 1/4 cups salsa verde
1/4 cup snipped fresh cilantro

Method:
1.)  Preheat oven to 400 degrees.  Cut four of the tortillas in half and then into 1/2 inch strips. 
2.)  Toss with 1 tsp. olive oil and spread in a single layer on a baking sheets.
3.)  Bake for 10-12 minutes, or until crisp.  Stirring once.  Remove from oven.

4.)  Chop chili peppers (removing seeds and membranes) and onion.
5.)  Toss chicken with cumin in small bowl.
6.)  Grate or food process the remaining 4 tortillas.

7.)  Cook chicken in the remaining 1 tsp. of olive oil for approximately 5 minutes.
8.)  Add chili peppers and onions and cook until tender.
9.)  Add in minced garlic, cook additional 30 seconds.
10.)  Stir in broth, beans, salsa and grated tortillas.
11.)  Bring everything to a boil, reduce heat and simmer uncovered for 15 minutes.
12.)  Garnish with freshly snipped cilantro and with the baked tortilla strips.

Click here for printable recipe

Saturday, February 4, 2012

Remembering My Aunt Florence

My Aunt Florence was a great cook.  One of the most memorable parts of eating at her house though was not always the cooking, it was my Uncle George's prayers.  He was a Baptist minister and took his praying VERY seriously.  He could pray so long my aunt would have to reheat the entire dinner.  As a hungry kid, that was just torturous.  My aunt never seemed too upset by it.  Usually just an, "Oh George, dinner's cold now." and then bustled off to reheat things.  My Uncle George and Aunt Florence's house was our favorite place to visit when we lived on the Navajo Indian Reservation for a year.  They lived in Holbrook, 80 miles away, but it was a trip we made often, just to be with family.  My sister and I had a special table in the kitchen where my aunt would give us all kinds of great things to eat.  While we ate we looked out the window at what we called "Uncle George's Mountain".  It was a large rocky hill just past their backyard that and we loved to climb it and explore.  This dish is one of our favorite treats from Aunt Florence.  I made it for my own boys this week.  They liked it just as much as my sister and I did. 

My Aunt Florence has passed on but just one bite of this fruit salad and I was back in her kitchen, swinging my legs at my spot at the table and planning my next "mountain top" adventure.

Aunt Florence Salad  
Ingredients:
2 apples, peeled, cored and cubed
2 pears, peeled, cored and cubed
2 Tbsp. lemon or lime juice
2 bananas sliced
4 Tbsp. mayo
1 1/2 cups whip cream (more if you like)
1/2 cup chopped walnuts

Method:
1.)  Combine apples, pears and lemon or lime juice.
2.)  Stir in banana slices
3.)  Add mayo, whip cream and nuts.
4.)  Stir until mixed.
Enjoy!

Click here for printable recipe

Thursday, February 2, 2012

Fox-Hunting Sandwiches

This recipe is from my grandma.  Her name was Mildred, or Millie to friends.  I adored her.  She was a wonderful cook and made the best apples pies known to man.  This is a recipe for sandwiches she used to make for my grandpa when he went fox hunting. She named them "Stack Sandwiches" after the breed of fox hound my grandpa raised, "Stack".  My grandma wrapped them in tin foil so they could be heated near the campfire when the men were ready to eat their dinner. They were a big favorite with the guys who went fox hunting with my grandpa. My mom used to go along when she was a little girl, but she didn't like cheese on hers.  My grandma used to wrap the sandwiches and put a toothpick in the ones without cheese so my mom could have the ones she liked.  I love knowing a story behind a favorite recipe.  It makes me feel closer to my grandma somehow.  I'm glad to be able to share this with my boys and now with you. 

 Hopefully it will pass to many more generations!

Stack Sandwiches 
Ingredients:
1 Tbsp. Olive Oil
1 medium onion, chopped
2 pounds ground turkey
1/2 cup ketchup
1 Tbsp. mustard
1 can of chicken gumbo soup
dash of garlic salt or powder
1 Tbsp. BBQ sauce
salt and pepper to taste

***Hamburger buns & cheese slices

Method:
1.)  Saute the chopped onions in the olive oil.
2.)  Add the meat to onions and brown.
3.)  Once the meat has cooked, add all the other ingredients and mix together
4.)  Pile the mixture onto some buns, place some cheese on top to melt (if you like it) and ENJOY!!!

Click here for printable recipe

Wednesday, February 1, 2012

No Fuss, High Class Desserts

If you want a recipe for a beautiful dessert that seems like you've worked for hours and hours, with boundless culinary expertise, this recipe is for you!!  My mom taught me to make these in Jr. High.  Since that time I've made them for baby showers, wedding showers, parties of all kinds and even for my sister-in-law's wedding reception (that was, without a doubt, the most I've ever made at one time).  You can get as fancy as you want and pipe out the pastry batter with a bag and a large tip or simply use a spoon  One of my favorite parts of making them is that the filling can be anything you want it to be!  You can fill them with all kinds of different puddings, fruit or even a chicken salad for adorable little sandwiches at a party!  I've always been so grateful my mom added this to my cooking arsenal at an early age.

Thanks Mom!!!

Cream Puffs (or Éclair if you want to be fancy) 
Ingredients:
1 cup water
1 stick butter
1 cup flour
1/2 tsp. salt
2 large eggs
Filling (pudding mixed with whip cream, fruit, chicken salad - let your mind go wild!)

Method:
1.)  Melt butter in water in a medium saucepan.
2.)  Sift flour and salt into the water/butter mixture.
3.)  Stir until it forms a ball. Remove from heat.  This happens fairly quickly.  It will start to clump together.
4.)  Let dough cool.  I typically stick it in the fridge (on a hot pad) for about 10 minutes.  This is so you don't cook the eggs on the hot dough when you add them)
5.)  Beat in eggs, 1 at a time.  Okay, this is unappetizing to talk about, but this is the worst part of the process.  It's a slimy mess in the pan at this time.  It seriously looks a bit like snot.  However, keep stirring and the eggs will get worked in.
6.)  Drop onto baking sheets (or pipe onto) by teaspoonful.

7.)  Bake for 15 minutes at 450 degrees.
8.)  Then bake for 25 minutes at 325 degrees.

9.)  Cut off tops of the pastry.  It will look something like this....

  Not much space to fill huh?
10.)  Scoop out the inside of the "puff"  Now it should look something like this...

   More space for your favorite filling now!!
11.)  Now spoon or pipe in your favorite filling and pop the top back on!


*** These will freeze well, so if you have extra stick them in the freezer.  They do not keep well in the fridge and will become soggy.  The freezer is your best bet for keeping them in good shape and edible.  The best is eating them the day they are made though.

For printable recipe click here