Kitchen Creations

Monday, August 27, 2012

Tasty, healthy & EASY!

I have a Rachael Ray cookbook that I love, it's called Express Lane Meals.  It's got three different sections; "Meals for the exhausted", "Meals for the not too tired" and "Bring it on! (but, be gentle).  This recipe comes from the "meals for the exhausted" section, so that should clue you in to the difficulty level.  She calls it "Cacio e Pepe (Cheese & Pepper Pasta) and Spinach with White Beans.  I call it just plain GREAT!!  The ingredients are simple and the method is easy.  On top of simple and easy, it tastes fantastic.  I have a picky eater in my house.  He'd be happy if I made him nachos or peanut butter and jelly sandwiches every night.  This pains me, to say the least.  He is not usually very excited about the new dishes I make.  He has to take his "no thank you" bite though.  (You must take a bite and try it before you can say "No thank you" to it.)  Last night he was excited about the "noodles" and his excitement turned to joy, his and mine, when he returned for 2 extra helpings of this meal!  My other boy loves just about anything and eats heartily.  He went for 3 rounds as well.  This meal will now be in the weekly rotation.  It's tasty, healthy and above all, EASY!!

Enjoy some of this simple goodness tonight with your family!

Cacio e Pepe (Cheese and Pepper Pasta) and Spinach  with White Beans 
*From Rachael Ray's Express Lane Meals cookbook
Ingredients:
Salt
1 pound thin spaghetti noodles
3 Tbsp. butter
5 Tbsp extra virgin olive oil
2 tsp. coarse black pepper
1 cup grated Pecorino Romano cheese
1 10-ounce box of chopped frozen spinach
4 garlic cloves, chopped or minced
1 14-ounce can cannellini beans, rinsed and drained
1/4 tsp. ground nutmeg

Method:

  • Bring a large pot of water to boil.  Salt the water and add pasta to boil (according to package directions - about 6 minutes).
  • ***You'll want to save 2 ladles-ful of the pasta water before you drain it!!!  Don't forget
  • While pasta is boiling, place a large skillet over low heat and place butter and 1 Tbsp. of the olive oil and pepper into it.  Let this slowly melt until the pasta is done.
Yummy!!

  • Also while pasta is boiling, defrost the spinach in the microwave for 6 minutes on high. 
  • Heat a small skillet over medium heat.
  • Add 2 Tbsp. olive oil, then the garlic, cook garlic for 2 minutes.
  • Now add the beans to garlic. 
  • Next add the spinach to the beans, breaking it up as you drop it into the pan.

  • Season the spinach and beans with nutmeg, salt and pepper
  • When the pasta is done remember to reserve 2 ladles-ful of the pasta water and add 1 ladle to your melted butter-pepper mixture.
  • Drain the pasta and toss it in the pan with the butter, pepper, pasta water sauce.
  • Turn off the heat and add the cheese in small handfuls, tossing with tongs until all the cheese in incorporated.  It will form a creamy sauce to coat the pasta.
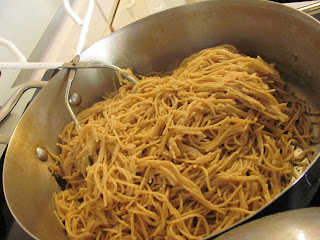
 

  • Add another ladle of cooking water if needed (I add the 2nd ladle every time).
  • Now season the pasta to taste with salt and drizzle with 2 Tbsp. of olive oil.
  • Serve the pasta and spinach-bean mixture side by side (although, mixing them also tastes great!!)       
Enjoy!


Click here for printable recipe.


Wednesday, July 11, 2012

Cooking Lessons

I've started giving my boys cooking lessons.  They enjoy being in the kitchen and both really love creating something good to eat.  I consider it my gift to my future daughters-in-law.  Husbands that cook yummy stuff for them and love doing it.  That's my goal.  It doesn't hurt that at the same time they work on reading skills, following directions and math (fractions).  All in all, it is something we enjoy doing together with a pretty sweet outcome!  Today's cooking lesson featured fresh raspberries from my friend Stacy's yard.  
Look at these beauties!
 I found a recipe for fresh strawberry yogurt cake on a great food blog, A Spicy Perspective., and with a few alterations we had a delicious raspberry yogurt cake to indulge in this afternoon. 

In honor of my "chef" sons, I give you "Raspberry Delight" - their name for it.

Raspberry Delight 
Ingredients:


  • 1 cup (2 sticks) butter, softened
  • 1 1/2 cups brown sugar
  • 2 eggs
  • 3 Tb. lemon juice, divided (half in the cake batter & half for the glaze)
  •  1 1/2 tsp. vanilla extract   (1 tsp. in the cake batter and 1/2 tsp. in the glaze)
  • 2 1/2 cups white whole wheat flour
  • ½ tsp. baking soda
  • ½ tsp. salt
  • 1 cup of vanilla flavor greek yogurt
  • 2 1/2 cups fresh raspberries
  • 1 cup powdered sugar


  • Method:
    • Preheat oven to 325 degrees. Grease and flour a 10 inch Bundt pan 
    •  Combine 2 1/4 cups of flour with baking soda and salt and mix well.
    • In a seperate bowl cream together the butter and brown sugar.
    • Add eggs, 2 Tbsp. of lemon juice and 1 tsp. vanilla extract to the butter and sugar. Mix well.
    • Add 1 cup of yogurt to the batter and mix well.  Then add flour mixture and combine until all ingredients are just incorporated (don't mix to much or too long).
    • Toss the raspberries with the remaining ¼ cup of flour. Fold gently into the cake batter.
    • Pour the batter into the Bundt pan. Bake in the preheated oven for 60 minutes.  At this point a toothpick inserted in the center should come out clean.       
    Here it is, cookin' away!
    •       Place on a wire rack and let cool for 20-30 minutes.
    Golden on the outside
    • 9.   Once the cake has cooled whisk together the remaining 1Tb. of lemon juice, 1/2 tsp. vanilla extract and the powdered sugar. Drizzle over the top of the cake.


    Click here for printable recipe.

    Monday, July 9, 2012

    Sharing The Love

    Oh how I've missed posting on my blog!  I'm enjoying the summer and the slower pace of life it brings.  Our garden is producing like crazy and we harvested our first 4 blackberries (out of hundreds!) last night.  Honestly, I don't think you can beat Yakima in the summer (or the spring, or the fall, or the winter for that matter - I guess I love it here!).  The other thing Yakima seems to be producing alot of lately is babies, at least in our church!  This post is about the meal that is quickly becoming one of my standard "new arrival" meals to the family.  We love it and it's easy, transportable and FULL of delicious flavor.  I found it, thanks to my "Darling" friend Regina, in a Rachael Ray cookbook.  Regina marked this one with a note, as she did all her favorites.  I know I would have loved it anyway but there is something emotional and special about making recipes that are shared favorites with someone you love.  So now I make this to share my love with others around me.  It just feels so right.

    Share the love with your family tonight!

    Pasta in Vodka Cream Sauce  
    **Adapted from in "Classic Rachael Ray 30 minute meals - The All Occasion Cookbook"
    Ingredients:
    Salt & Pepper to taste
    1 box of your favorite pasta - I typically use whole wheat penne or elbows
    1 Tbsp. of extra virgin olive oil
    1 Tbsp. butter
    2 cloves of garlic, minced
    1 shallot, minced
    1 cup vodka
    1 cup chicken broth
    1 can (28 ounces) of crushed tomatoes
    1/2 cup cream (you can use heavy cream, half and half, or even milk in a pinch - I've used them all)
    20 leaves of fresh basil, torn
    1-2 chicken breasts - baked (if desired - This can make the meal a bit heartier if you need meat.  We enjoy it both ways.)

    Method:
    Boil water in a large pot over high heat.  When water comes to boil add salt and pasta.  Cook according to length on package directions.
    While pasta is cooking, heat a large skillet over medium head.  Add the olive oil, butter, garlic and shallots.  Saute for 3-5 minutes.  Add vodka and cook to reduce by half.  This usually takes at least 3-5 minutes.  You'll see that it's not as liquidy in the pan and the strong smell of alcohol no longer threatens to choke you as you stand over the pan.  This is a really important step.  If you don't let it reduce enough your sauce will NOT taste good. 
    Once vodka is reduced, add the childen broth and tomatoes.  Allow the sauce to begin to bubble, then reduce the heat and simmer.
    Season with salt and pepper.
    Stir in cream and return sauce to a bubble. 
    This sauce is sooooo yummy!
    Once the sauce bubbles, remove it from the heat and toll in the hot pasta, chicken (if desired) and torn basil leaves.  Serve immediately with a sprinkling of parmesan cheese if desired!


    Click here for printable recipe.

    Sunday, July 8, 2012

    It's Berry Good!

    One of the best parts of summer are the berries.  Blueberries, raspberries, blackberries!!!  I love berries.  I've also discovered I love them with rhubarb and peaches, some of the other wonderful "plants" of summer!!  I had rhubarb, peaches and blackberries still in my freezer from last summer and needed to clear them all out for the next crops coming in.   What's a girl to do???  Make a crisp of course, a peach-rhubarb-blackberry crisp to be exact.  In case you are wondering, there were no recipes for this particular flavor combination, until now!!!  I looked through about 50 different "crisp" recipes and combined some of the ideas I found their with some from my own imagination and came up with this delectable recipe.  My small group Bible study got to taste test again and they were all pretty happy with it, including one of our favorite 2 year olds - Lewis!
    Lewis chowing down. 
    The helmet was my boys' idea, to keep Lewis safe from injury.
      So have some tonight, you'll be licking your lips like Lewis!

    Peach-Rhubarb-Blackberry Crisp 
    Ingredients:
      Filling:
    1/2 cup brown sugar
    5 Tbsp. all purpose flour
    1/2 tsp. nutmeg
    1/2 tsp. ground ginger
    1/8 tsp. salt
    3 cups frozen or fresh rhubarb, sliced 
       (Note: If the rhubarb is frozen you'll want to thaw it completely and drain in a colandar, but don't squeeze the liquid out of it.)
    2 1/2 cups frozen or fresh peaches, sliced
    2 cups frozen or fresh blackberries
      Topping: - I double this topping because I like LOTS of yummy crunchiness on top! I'm giving 
      you the single batch version in case you like sparse topping or to play with the amounts yourself.
    1/2 cup flour (I used white whole wheat)
    1/2 cup old fashioned oats
    1/2 cup packed brown sugar
    3/4 tsp. ground cinnamon
    1/4 tsp. ground ginger
    1/8 tsp. salt
    7-8 Tbsp. butter, cubed

    Method:
    Pre-heat oven to 350 degrees.
    Combine all ingredients for filling in a large bowl and mix well.
    Transfer to a 9X13 baking dish.
    Love all the vibrant color in this dish!

    In a separate bowl, combine the flour, oats, sugar, cinnamon & salt.  Mix well.
    Add in the cubed butter and mix with fork or fingers until the mixture is wet but still crumbles.  (This is a thicker crumble on top).
    Crumble topping over berry/peach/rhubarb mixture.
    This topping is so good I could eat it by itself!

    Bake at 350 for 40 minutes - or until top is golden and fruit mixture is bubbly.


    Click here for printable recipe.


    Saturday, July 7, 2012

    A real and healthy alternative

    I have been wanting to make my own granola bars for some time now.    I don't like buying boxes of food with a multitude ingredients I can't pronounce and sugar content that makes me wince.  Granola bars, as we know them, are glorified candy bars, in my humble opinion.  Yet, what is the easiest thing to stick into that sack lunch I make for my oldest, my husband and myself?  Yep, you got it and so I continue this cycle and feel horrible everytime!!!  Enough already!!  I want to feel good about what I'm putting into my kid's bodies and my own!
     A few weeks ago while at my friend Amy's, I tried her first attempt at homemade granola bars and they were delicious.  We both talked about wanting a recipe that was more chewy than crunchy, which equals far less mess with kids (or adults) around.  I came across this chewy looking granola bar on the blog "Can you stay for dinner?"  I added a few things and tweaked a few others (I am me after all) and my boys helped me put this recipe together in their first of "Mama's summer cooking classes".   It was easy enough for my 5 and 8 year old to follow (with some help from Mom) and so incredibly tasty and CHEWY!!!  These bars BEND folks!!  So if you are looking for a healthy & tasty alternative to snack bars full of high fructose corn syrup, processed grains and sugars galore look no further, this is your bar!  With oats, nuts, wheat bran, dried fruit and honey, you just can't go wrong!

    Toasty Oat & Fruit Bars 
    Ingredients:
    3 cups old fashioned rolled oats
    1 cup sliced or ground nuts (your favorite - I used almonds)
    1/4 cup wheat bran
    1 cup dried fruit (I used cherries & craisins)
    3 Tbsp. sesame seeds
    2 Tbsp unsalted butter
    3/4 cup honey
    1 1/4 tsp. vanilla extract
    1/2 tsp. salt
    cinnamon, nutmeg and ginger added to own desired tastes (optional)

    Method:
    Pre-heat oven to 350 degrees.  Line 9X13 pan with foil and spray foil with oil or cooking spray.
    Spread oats over large baking sheet and toast for 10-15 minutes.
    After oats toast, reduce temperature to 300 degrees.
    Pour toasted oats into a large bowl.  Mix in nuts, wheat bran, dried fruit and sesame seeds.
    Melt butter in small saucepan over medium heat.  Add honey, brown sugar, vanilla, salt and spices (if desired). 
    When butter mixture boils, remove from heat and pour over oat mixture.
    Mix well and pour into prepared 9X13 pan.
    Wet your hands and press mixture into pan evenly.
    Bake at 300 for 25 minutes (until top is golden).

    Allow bars to cool for at least 2 hours before cutting.  I turned them over on a cutting board and peeled off the foil then cut into desired size.


    Enjoy!!


    Click here for printable recipe.

    Wednesday, May 2, 2012

    More Blueberries!

    Sadly, this is my last post about blueberries for a bit.  I have used up the last of these frozen wonders from last summer.  The good news is that there will be plenty more to come since we've just planted our own blueberry patch!!  Woo-hoo!  I love all the things we are able to grow here in this beautiful valley and the huge yard God has blessed us with.  Although this is the last of the blueberry recipes  for awhile, it's a great one to end on.  This was originally called a "breakfast cake", but I think it's too sweet for that, so we're just going with dessert on this one; small group dessert to be exact.  When I found the recipe at the "Alexandra's Kitchen" food blog, I knew right away I'd be making it, and soon!!  How can you resist a recipe with blueberries AND buttermilk?!  I couldn't and turns out I was glad I couldn't.  We put the small in small group that night with only 4 adults and 2 kids.  Regardless, we put a HUGE dent in this dessert.

    Banish the midweek "blues" with this blueberry goodness tonight!!

    Buttermilk Blueberry Cake 
    Ingredients:
    ½ cup unsalted butter, room temperature
    2 tsp. lemon zest or more — zest from 1 large lemon
    3/4 of a cup packed brown sugar
    1 egg, room temperature
    2 tsp. vanilla
    2 cups flour (white whole wheat worked great)
    2 tsp. baking powder
    1 tsp. kosher salt
    2 cups fresh blueberries
    ½ cup buttermilk
    1 tablespoon granulated sugar for sprinkling on top

    Method:
    • 1. Preheat the oven to 350ºF. Cream butter with lemon zest and 3/4 cup of the sugar until light and fluffy.
    • 2. Add the egg and vanilla and beat until combined. Meanwhile, toss the blueberries with ¼ cup of flour, then whisk together the remaining flour, baking powder and salt.
    • 3. Add the flour mixture to the batter a little at a time, alternating with the buttermilk. Fold in the blueberries.
    • 4. Grease a 9-inch square baking pan (or something similar) with butter or coat with non-stick spray. Spread batter into pan. Sprinkle batter with tablespoon of granulated sugar. Bake for 45 minutes. Check with a toothpick for done-ness.  Depending on your oven you may need more or less time.  Start checking for done-ness and desired "golden-ness" (I'm liking the "ness" words today!) at about 35 minutes. 
    • Let cool at least 15 minutes before serving.
    Click here for printable recipe

    Tuesday, May 1, 2012

    The Beauty of Cranberries

    Cranberries are another baking favorite of mine.  The problem with cranberries though.... they are seasonal and one can have the MOST difficult time finding them at any time of the year other than Thanksgiving.  This year I got smart.  When those deals hit the stores selling cranberries 2 bags for $3, I stocked up and froze them!!  Now I can make cranberry whatever, whenever!!  (Let me take a moment to congratulate myself on that spectacular move.............. Ok, done.) 

    I discovered this particular recipe at "JoyofBaking.com" and made a few alterations (I am me after all.)  The result was a gorgeous and delicious shortbread; the perfect accompaniment to a nice hot cup of tea or coffee.  Seriously, the beauty of cranberries once baked is undeniable.  That deep, rich red is simply divine! 

    Once again, I have decided that almost any berry will work here, but the tartness of the cranberry really rounds out the sweet flavor and dryer texture of the shortbread.  It was delectable and enjoyed by all. 

    If you are looking for a great brunch, tea or dessert item that looks as good as it as it tastes, you've found it here!


    Cranberry Shortbread Bars 
    Ingredients:
    **For the Cranberry Filling:
    2 1/2 cups fresh (or frozen!!) cranberries
    3/4 cup of granulated white sugar
    1/8 tsp. ground ginger
    3 Tbsp. water

    **For the Shortbread
    2 cups flour (I used white whole wheat)
    2 Tbsp. cornstarch
    1/4 tsp. salt
    1 cup unsalted butter, at room temperature
    1/3 cup brown sugar - packed
    1 1/2 tsp. vanilla

    Method:
    Pre-heat oven to 375 degrees.  Grease a 9X9 inch pan
    In a medium sized saucepan, combine all the ingredients for you cranberry filling (cranberries, white sugar, ginger & water). 
    Cook over high heat until boiling.  Continue to boil until cranberries become thick.  This should take about 5-7 minutes. 
    Remove cranberries from heat and let cool.
    Cream the butter with a mixer until smooth.  Add the brown sugar and again beat until smooth.  Beat in the vanilla extract.
    In a separate bowl combine flour, cornstarch and salt.
    Add the flour mixture to the butter and sugar mixture, combine gently until the flour is just incorporated.
    Press 2/3 of the shortbread mixture into the bottom of the greased pan. Then spread the cranberry fillin over the shortbread.
    Crumble the remainder of the shortbread dough over the cranberry filling using your fingers.  Then lightly press the dough into the filling.
    Bake for 30 minutes, or until golden brown on top and remove to wire rack to cool.

    Click here for printable recipe